Coordinated by Photopolymer Additive Manufacturing Alliance (PAMA)* Members Callie Higgins and Jason Kilgore, NIST
Photopolymer additive manufacturing (PAM), or vat photopolymerization (VPP), is a powerful tool that enables three-dimensional (3D), micrometer-level control of the geometric, mechanical and chemical properties of a fabricated part. While useful and potentially transformative for many industries, being able to efficiently and accurately measure these structures is imperative to enable VPP’s use in mainstream manufacturing.
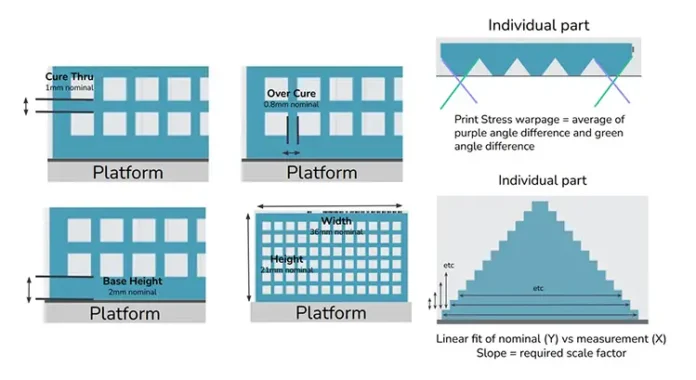
Specifically, the final part fidelity (i.e., how well a final part matches the desired design) is a difficult, though critical, measurement to quantify before production as it dictates the 3D resolution and, ultimately, application spaces for a given part. Full 3D geometric characterization of all parts (e.g., with X-ray computed tomography) would be far too expensive for production. As such, reference geometries are used to establish the resin, printer and process characteristics. From the reference part, there are four main quantities needed to characterize the accuracy before a resin and printing procedure is moved into production: 1) cure thru, 2) overcure, 3) warpage and 4) shrinkage.
At the recent 2023 PAMA Workshop, it came to our attention that while we understood companies often employed their own standard operating procedures (SOPs) to measure these print characteristics, we didn’t realize how open they might be to sharing these with the community at large. This struck us as not only insightful, but also something that could be quite useful if distributed through the right channels.
To facilitate this insight, we sat down with Michelle Hoffecker, engineering manager, and Matt Panzer, principal R&D scientist, of Carbon to discuss the evolution of their approach and methods to characterizing accuracy for their print processes. They indicated that because the PAM industry did not have sufficient measurement infrastructure and standards to quantify dimensional accuracy in a given part, they developed their own methods in-house. They hope that their measurement processes to quantify and isolate sources of inaccuracies will extend beyond digital light processing VPP and can be applied across the PAM industry.
Where do you look for inspiration on measurement developments (academia, competitors in PAM, other polymer industry (e.g., foams), other AM industry, etc.)?
Carbon: The core dimension accuracy characterization processes we’ve developed have not been strongly based on any existing measurement developments but largely have been driven to address customer needs and requirements. In the development of our internal accuracy characterization methods, we’ve valued the ability to isolate specific accuracy factors, ease of manufacturing (in this case, printability and post-processing), high measurement repeatability and speed to measure.
What are the most important metrics you use to determine print fidelity today, and how are they identified/measured?
Carbon: Our main categories for assessing part quality are as follows:
- material properties (standard ASTM processes);
- accuracy (using internal Carbon processes);
- surface finish (surface roughness measurements and visual inspection of standard internal parts); and
- printability (Carbon has collected “challenge” geometries over the years that we use to assess printability).
Are the measurement needs different for lattices vs. dense solids? How about different applications/markets?
Carbon: Focusing on dimensional accuracy, the short answer is “sometimes.” There are metrics we use at Carbon that are applicable to both lattices/thicker solid parts and across different applications and markets (cure thru, overcure, wall thickness-dependent shrinkage) and others that are application-dependent. For example, rigid materials experience print stress warpage more so than elastomers. Elastomer lattices experience phenomena such as solvent swelling (potentially leading to scaling inaccuracies) more so than rigid parts.
How did you develop the measurements to identify these metrics?

Carbon: Our measurement methods and characterization geometries have evolved over the years. Typically, the first iteration is based on a feature that really showcases the metric. For example, the first indication that cure thru (excess curing in the Z direction) was present was when we saw that vertical round holes always were ovular rather than circular. From here we developed test parts that isolate this metric and its dependencies on geometry and print conditions. An example shown in Chart 1 is what we call the “overcure-thru” (OCT) part to isolate vertical and horizontal overcure. A key aspect of measurement development is to consider its printability as well as the ease of high-throughput measurement. For example, many of the test parts are designed to be measured on our onsite Keyence IM-6225, which allows for quick and repeatable measurements. Similar parts for warpage and shrinkage are shown in Chart 1.
How/does your team use these measurements to inform system/materials development?
Carbon: The most widely used part is the OCT part. It has multiple uses, including understanding accuracy performance during materials formulation work, lot-to-lot variation during the resin quality control process, how various print parameters impact local accuracy, how accuracy variation looks on new hardware and diagnosing print issues at customer sites. These data then are used in multiple ways to optimize part accuracy through our software algorithms, hardware and resin formulation.
Where do you see the balance between internal trade secrets and industry-shared knowledge as it pertains to measurements and standards?
Carbon: My personal opinion is that knowledge pertaining to characterization rarely needs to be kept as an internal trade secret, and sharing characterization methods only can help push forward the adoption of PAM. As an example, when customers look at our materials portfolio, they easily can assess whether a certain material meets their material property needs by looking at tensile/thermal/chemical properties determined from standard methods across the polymer industry as a whole. Where it gets challenging is when customers are interested in understanding accuracy capabilities. Our conversations with customers around accuracy capabilities, in comparison, have never been as straightforward. Setting industry standards for accuracy characterization could help dramatically in those conversations, in addition to pushing advancement in the industry as a whole!
What do you see as a hurdle in adopting these metrics for a documentary standard?
Carbon: At this point, I would assume many PAM companies have developed their own accuracy characterization methods in isolation, so determining a standard set of methods could be difficult from that perspective. Additionally, there likely are accuracy features that are critical in understanding for DLP technologies, but not as much for other processes, and vice versa, which would add difficulty to isolating a set of metrics to become PAM industry-wide standard.
*PAMA, a collaboration between the National Institutes for Standards and Technology (NIST) and RadTech is an alliance of industry, academic, governmental, and NGO organizations with the goal of bringing commonly accepted standards and practices to the field of PAM. Commercial equipment referred to in this article is identified for informational purposes only, and does not imply recommendation of or endorsement by the National Institute of Standards and Technology, nor does it imply that the products so identified are necessarily the best available for the purpose.


